


Read the Full Series
This article is one part of a walkthrough detailing how we recreated an NXP i.MX 8M Mini–based computer using Quilter’s physics-driven layout automation.
Weeks of PCB layout are no longer a given. With the right inputs and a physics-driven PCB AI engine, many teams can go from schematic to fab-ready PCB design in a single work session. This guide walks through a realistic 4-hour PCB workflow with specific steps, time budgets, and quality checks so you can see exactly how Quilter fits into your existing PCB process and helps you get full fab-ready designs in hours.
If your team is trying to answer “how to get full fab-ready designs in hours,” the core idea is simple: treat layout like a repeatable, time-boxed pipeline. Tight prerequisites. Clear constraints. Parallel candidate generation. Fast, structured review. Then finish in your native CAD tool so you control final sign-off and fabrication outputs.
Let’s define what “fab-ready in hours” really means for PCB teams
When people say “fab-ready PCB design,” they often mean different things. For this workflow, “fab-ready” means:
- The layout is complete and internally consistent.
- It passes DRC in your CAD tool (or is within a small, obvious set of fixable violations like silkscreen clipping).
- It is ready for Gerber or ODB++ generation without major re-layout expected.
- You can confidently hand the design to fabrication and assembly with standard documentation (fab notes, stack-up notes, drill, pick-and-place, BOM, assembly drawing), based on your organization’s norms.
That definition matters because it draws a clean line between “Quilter generated a completed layout file” and “I can press send-to-fab with confidence.” Quilter’s job in this flow is to compress the placement and routing problem and surface multiple high-quality candidates quickly. Your job is to make sure design intent is correct, risks are understood, and your final export package matches your vendor requirements.
A 4-hour schematic to fab-ready in hours cycle is most realistic for board classes like:
- IC evaluation boards
- Design validation boards
- Environmental test boards
- Test fixtures and harness-adjacent interface boards
- Many internal bring-up and instrumentation boards that benefit from speed and iteration
It is less realistic for designs where the “last mile” is the main work, such as highly constrained RF layouts, very dense BGAs with extreme escape constraints, unusually strict mechanical packaging, or boards where requirements are still evolving mid-layout. Some of those can still benefit from autonomous PCB design, but your cycle might be closer to a day, not 4 hours.
Finally, compressing timelines does not mean ignoring physics. Signal integrity, power integrity, thermal behavior, and mechanical constraints still matter. The difference is when those checks happen and how many options you can explore. This workflow is an accelerator for iteration, not a replacement for engineering judgment. The goal is to get to a strong, manufacturable baseline quickly, then iterate with intent.
Here’s what you should have ready before you start the 4-hour cycle
Hitting a 4-hour PCB workflow is mostly about the inputs. If your schematic is still shifting, footprints are incomplete, or constraints live only in someone’s head, any tool will struggle to deliver speed without risk. The teams that consistently get schematic to fab-ready in hours treat the setup like a template.
Quilter is designed to work with your existing workflow. In practice, that means uploading an Altium, Cadence, Siemens, or KiCad project directly, then defining the board outline, fixed placements, and constraint intent before the generation window starts. Your CAD environment remains the source of truth for final edits and exports.
Prerequisites that matter most
1) Your schematic and libraries are “layout-ready.”
- Nets are named clearly (especially power rails, clocks, diff pairs, and interfaces).
- Footprints are current and verified.
- Variants are resolved or clearly scoped (DNP, alternates, population options).
2) Your board definition is real, not aspirational.
- Board outline is final enough to route around.
- Keep-outs, mounting holes, and mechanical no-go zones exist.
- You know what must be fixed in place (connectors, switches, mounting points, high-risk ICs).
3) Your rules exist in some form.
- Net classes and clearances are defined where possible.
- Critical nets are identifiable (impedance-controlled nets, differential pairs, clocks).
- Basic via strategy and constraints are not a mystery.
4) Your stack-up and vendor assumptions are chosen.
- Layer count is decided.
- Controlled impedance targets are known for the key interfaces.
- You have a preferred manufacturer profile or at least a standard capability set.
Quilter can help identify bypass capacitors, impedance-controlled nets, differential pairs, and other critical considerations for review, but the best results come when your design intent is explicit.
Checklist callout: If you can say yes to these items, you’re ready for a 4-hour run
4-Hour Run Readiness Checklist (5 to 7 items)
- Schematic is stable enough that major pin swaps or part changes are unlikely today
- Footprints are up-to-date for all placed components, especially ICs and connectors
- Board outline, keep-outs, and mounting holes are defined
- Fixed placements are identified (connectors, mechanical features, key ICs)
- Net classes exist for critical nets (diff pairs, clocks, impedance-controlled nets)
- Stack-up is selected (layer count, impedance targets, basic via rules)
- You can name your primary fab and assembly expectations (clearances, drill sizes, finish)
If you are missing one or two, you can still run the workflow, but expect your first pass to land closer to 5 to 6 hours while you tune templates.
How do you go from schematic to manufacturable layout in under 4 hours?
The simplest way to understand the schematic to be fab-ready in hours promise is to treat it like a time-boxed pipeline with clear ownership. Some phases are human-led. Some are automated by Quilter’s physics-driven PCB AI engine. The key is that the most expensive search problem, placement and routing trade-offs under constraints, runs in parallel across many candidates.
A realistic 4-hour design cycle often looks like this:
- Input and setup: 30 to 45 minutes (human-led with tool support)
- AI layout generation: 60 to 90 minutes (Quilter-led, parallel exploration)
- Review and edits: 45 to 60 minutes (human-led with ranked candidates)
- Final checks and export: 30 to 45 minutes (human-led in your CAD tool)
During the AI window, Quilter generates multiple candidate layouts in parallel and evaluates them against physical constraints and manufacturability. Instead of betting the schedule on one layout path, you get options, ranked by constraint coverage and quality signals, then you choose the best candidate for your goals.
Below is a simple timeline table you can reuse internally to plan a 4-hour PCB workflow.
4-Hour PCB Workflow Timeline (time-boxed)
Phase
What happens
Primary owner
Time budget
1) Import and setup
Upload project, confirm outline, stack-up, fixed placements, sanity check rules
Engineer or PCB designer
30 to 45 min
2) Critical net tagging
Confirm diff pairs, impedance nets, clocks, power intent
Engineer
15 to 30 min
3) Generate candidates
Quilter explores placement plus routing options in parallel and scores outcomes
Quilter
60 to 90 min
4) Review and select
Compare ranked candidates, focus on risk areas and constraint coverage
Engineer plus PCB designer
30 to 45 min
5) Export and finish
Import into CAD, run DRC, last-mile polish, generate fab outputs
PCB designer
30 to 45 min
Here’s how the 4-hour PCB workflow breaks down step by step
This is the end-to-end workflow that turns PCB layout automation into a repeatable process.
Step 1 (15 to 30 min): Import into Quilter and confirm the board definition
Actions
- Upload your project from Altium, Cadence, Siemens, or KiCad.
- Confirm board outline, keep-outs, mounting holes, and key mechanical constraints.
- Pre-place components that must be fixed (connectors, switches, mounting-critical parts).
- Choose your stack-up or manufacturing profile, including layer count and any must-have rules.
Why this step matters
Most schedule slips come from ambiguity. The board definition is what keeps the generator from producing layouts that look “possible” but conflict with physical reality. If you lock down the outline and fixed placements, the rest of the work becomes a solvable optimization problem.
Output
A clean imported project with a defined outline, known fixed placements, and an initial rule sanity check.
Step 2 (15 to 30 min): Tag critical nets and confirm what Quilter will recognize
Actions
- Mark differential pairs, clocks, impedance-controlled interfaces, and any length-matching groups.
- Review bypass capacitor strategy and any special power requirements.
- Confirm high-risk interfaces: DDR, SerDes lanes, sensitive analog front ends, high-current rails.
Ownership
This is engineering-led. Even with physics-driven PCB AI, the best results come when design intent is explicit. If a net is critical, label it as critical.
Output
A constraint set that matches your real priorities, not just your default CAD rules.
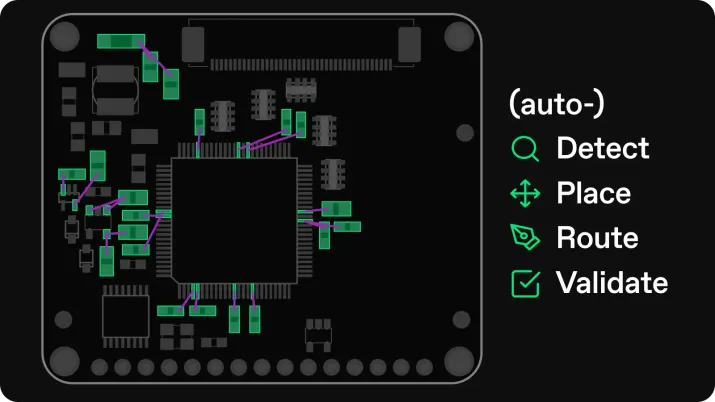
Step 3 (60 to 90 min): Quilter generates full placements and routes in parallel
What Quilter does during the AI time box
- Explores dozens of complete placements and routing solutions in parallel.
- Scores candidates against constraint coverage and manufacturability.
- Performs continuous verification checks during generation so issues surface early.
- Produces ranked candidate layouts for review.
What you do during this window
Use the time to prepare your review checklist and decide what “best” means for this board. For example: smallest area, cleanest routing, best power distribution, shortest critical paths, or easiest bring-up access.
Output
A set of candidates that represent meaningful trade-offs, not just variations in trace cosmetics.
Step 4 (30 to 45 min): Review candidates and select a winner
How to review quickly without missing the important stuff
Focus on a few high-signal questions:
- Are the critical constraints met (diff pairs, impedance rules, length matching groups)?
- Do the placement decisions make sense for power integrity and routing density?
- Are connector regions clean and mechanically plausible?
- Are there any obvious risk zones like dense breakouts, sharp bottlenecks, or questionable return paths?
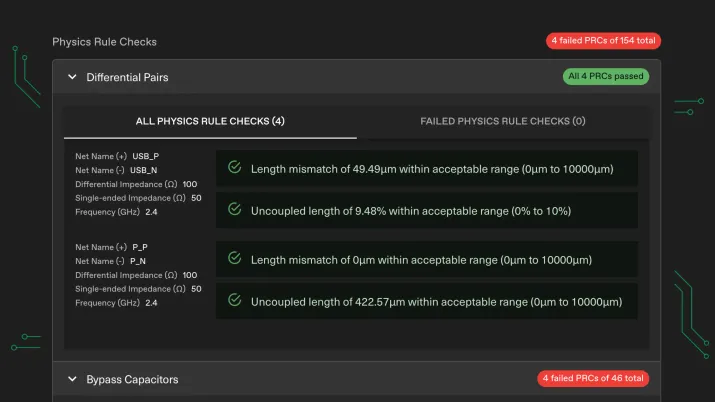
Quilter’s transparent design review feedback is built for this phase. You are not guessing which constraints were satisfied. You are inspecting what is done and what needs attention.
Output
One selected candidate that you will export back into your CAD tool.
Step 5 (30 to 45 min): Export to your CAD tool, run DRC, polish, and generate fab outputs
Actions
- Export the selected candidate back into your native CAD environment.
- Run standard DRC and any project-specific checks.
- Apply last-mile edits: silkscreen cleanup, fiducials, test points, reference designators, house-style details.
- Generate fabrication outputs: Gerbers or ODB++, drill files, assembly drawings, and fab notes.
What this step proves
This is where “fab-ready PCB design” becomes real. You are producing the same outputs you would for any board, just with far less time spent on manual placement plus routing.
Output
A fab package that matches your normal vendor handoff process.
What you need to know about manufacturability, DFM, and stack-up choices
Fast layout only matters if the result is manufacturable. In a 4-hour PCB workflow, manufacturability is not a final hurdle. It is part of the search space from the start.
How manufacturability fits into the fast cycle
Manufacturing profiles and rules
Quilter operates within manufacturing constraints such as clearances, trace widths, and via rules that align to standard board house capabilities. The best practice is to define a manufacturing profile that reflects your primary vendors so generated candidates are realistic, not theoretical.
Controlled impedance and high-speed rules
If you are doing impedance-controlled nets, the stack-up choice is not a detail. It is foundational. Decide your layer count and impedance targets up front. Then your rules become consistent and the generation window can evaluate against those assumptions rather than guessing.
DFM checks you should still run
Even in a compressed cycle, you should still run your normal final checks, such as:
- CAD DRC and clearance verification
- Drill and annular ring checks per vendor limits
- Solder mask and paste rules
- Manufacturer-specific DFM tools if your organization uses them
- Assembly-related checks (courtyard, pick-and-place, polarity marks)
Example stack-ups you can swap quickly
These are not prescriptions, just common patterns teams use for fast iteration:
- 4-layer test board: Top signal, ground, power, bottom signal
- 6-layer eval board: Top signal, ground, signal, power, ground, bottom signal
The point is that once your templates exist, swapping between stack-ups becomes a parameter change, not a week-long redesign. That ability to iterate stack-ups quickly is one of the practical benefits of PCB layout automation paired with physics-driven evaluation.
How does Quilter’s physics-driven AI placement and routing actually work?
Engineers are right to be skeptical of “AI routing” claims. Many tools have called themselves PCB AI, but behave like a traditional autorouter with a new label. Quilter’s approach is different in two key ways:
- It generates complete layouts as candidates, not just routes on a fixed placement.
- It is trained to optimize against physics and manufacturing constraints, rewarding outcomes that satisfy real electrical intent and fab feasibility.
High-level view of the reinforcement learning loop
Reinforcement learning works by exploring actions in an environment and receiving rewards for outcomes. In PCB layout, the “environment” includes component placement decisions, routing choices, via strategy, and compliance with constraints. The “reward” reflects whether the design meets objectives like:
- Differential pair integrity and routing feasibility
- Length matching and timing constraints
- Impedance targets consistent with stack-up assumptions
- Clearances and manufacturing rules
- Reasonable via usage and routing density distribution
Instead of producing one deterministic guess, Quilter actively explores a broad set of candidate solutions, then ranks them by constraint coverage and quality signals. That is how teams explore more design variants without waiting days or weeks.
Continuous verification during generation
A major reason layout drags is that violations are discovered late. Quilter’s flow evaluates critical considerations during candidate generation so you are not bolting physics checks on after the fact. In practice, that means constraints like DDR length matching, impedance targets, clearances, and via usage are validated as part of scoring, not treated as a separate cleanup step.
Sidebar: What Quilter does automatically vs what you still own
Quilter typically automates
- Generating full placement plus routing candidates
- Evaluating candidates against constraints and manufacturability
- Ranking candidates for fast review
- Returning layouts in the same format you submitted for seamless handoff
Engineers and PCB designers still own
- Defining design intent, priorities, and constraints
- Reviewing risk areas and sign-off readiness
- Final CAD DRC, last-mile polish, and fab output generation
- Vendor-specific fabrication requirements and documentation
This division of labor is what makes autonomous PCB design practical in real organizations. You get speed without giving up control.
Here’s how review, polish, and fab outputs fit into the 4 hours
The fastest teams treat review and export as a standardized finishing process, not an open-ended design phase. The goal is not to make the layout “pretty.” The goal is to make it manufacturable, checkable, and ready for handoff.
Candidate review process
When reviewing ranked candidates, prioritize:
- Power distribution and return path plausibility
- High-speed regions like DDR, SerDes, clocks, dense breakouts
- Connector regions and mechanical edges
- Any dense areas where assembly risk increases
- Constraint coverage summaries provided by Quilter’s review view
Typical last-mile edits in CAD
Even when the core layout is done, teams often tweak:
- Silkscreen readability and placement
- Fiducials and reference marks
- Test point placement for bring-up convenience
- House-style aesthetics like via stitching patterns or labeling conventions
- Minor routing adjustments for lab access or noise mitigation
Time budgets that keep you inside 4 hours
A practical set of time boxes looks like this:
- Review and select candidate: 20 to 30 min
- CAD DRC and polish: 20 to 30 min
- Fab file generation and documentation: 10 to 15 min
The exact minutes vary by organization, but if you standardize these steps, the process becomes repeatable.
What results can you expect on your first few boards?
A 4-hour PCB workflow is a skill and a template, not just a tool. Your first attempt may land closer to 5 to 6 hours while you tune constraints, build a manufacturer profile, and decide how your team reviews candidates. The payoff is that each subsequent run gets faster.
What changes versus traditional manual layout timelines
In a traditional flow, a common pattern is:
- Days of placement and routing effort
- Back-and-forth on constraints and manufacturability
- Late discovery of key issues that trigger rework
In a Quilter-accelerated flow, the shift is:
- Placement and routing happen quickly through PCB layout automation
- Multiple candidates appear in parallel rather than sequentially
- Review is structured around constraint coverage and risk zones
- Iteration becomes cheap, so you do more cycles before freeze
Typical outcomes teams report early
Across board types like test fixtures, validation boards, and IC eval boards, teams often see:
- Dramatic reduction in cycle time from weeks to hours for the first manufacturable baseline
- More consistent adherence to defined constraints because they are evaluated continuously
- Fewer “hidden assumptions” because intent is surfaced explicitly in the workflow
- A larger set of design variants explored, which improves decision quality
Quilter messaging often highlights bring-up-ready boards in a single workday and backplane or interconnect iterations in under 24 hours. The 4-hour schematic to fab-ready in hours pattern is most reliable for boards where constraints are well-defined and mechanical packaging is known.
Scaling from one board to many
Once you have templates, the workflow scales. The same constraint patterns, stack-up profiles, and review checklists can be reused across programs. That is where the real leverage appears: not just one fast board, but a repeatable system that increases design capacity across teams.
Next steps: try a 4-hour “fab-ready” run with an existing schematic
If you want to validate this workflow with minimal risk, start with a board that is important but not safety-critical. Good pilots include:
- Test fixtures and interface boards
- IC evaluation boards
- Internal validation boards with known constraints
A simple pilot plan
- Choose the board: Pick one that has a stable schematic and clear mechanical outline.
- Clean inputs: Verify footprints, net names, and rule basics.
- Define constraints: Identify critical nets and select a stack-up.
- Run Quilter: Generate candidates, then select and export one.
- Compare: Benchmark time spent and quality versus your traditional layout baseline.
- Document: Track minutes per phase so you can build an internal case for scaling.
If you are evaluating tools, explore Quilter’s Product Overview and Workflow pages, then look at relevant Solutions pages like Test Fixtures and Harnesses, IC Evaluation Boards, and Design Validation Boards to match the workflow to your use case.