


Read the Full Series
This article is one part of a walkthrough detailing how we recreated an NXP i.MX 8M Mini–based computer using Quilter’s physics-driven layout automation.
Analog PCB design has always demanded a careful, manual touch-until now. With the rise of physics-driven AI, it’s finally possible to automate analog layout without sacrificing analog signal integrity or performance. In this article, we’ll explore why traditional and academic tools fall short, and how Quilter is redefining what’s possible for analog and mixed-signal boards.
If you’ve ever asked “what are the best automated tools for analog PCB design?”, the honest answer is: most tools automate pieces of the workflow, but not the hardest part, which is turning constraints into a layout that behaves correctly in the real world.
Let's define what makes analog PCB layout so challenging
Analog signals are sensitive in ways that digital designers can often ignore until very late. A few millimeters of trace length, a slightly different return path, an unshielded high-impedance node, or an innocent-looking via can change noise, gain, bandwidth, phase margin, or distortion. The schematic might be perfect and the board can still fail.
The root cause is that analog performance is layout-dependent. Parasitic capacitance, inductance, and resistance are not just rounding errors. They shape filters, alter feedback networks, inject coupling, and create unexpected poles and zeros. In a mixed-signal system, the analog front end is frequently sitting next to high-speed digital edges, switching regulators, clocks, and high-current return paths. That combination can turn “works in SPICE” into “mysterious noise floor” in the lab.
Manual layout is slow because the designer is doing continuous physics reasoning: controlling return currents, minimizing loop areas, separating domains, managing impedance and coupling, and preventing ground loops. This work is highly contextual. It depends on frequency content, impedance levels, power topology, shielding, stack-up, and even connector placement. It also requires strong instincts about what matters most when constraints conflict.
Most automation fails here because connectivity is not enough. A router can connect pins. Analog layout has to manage electromagnetic behavior. That means any serious automation must be physics-aware, not just rule-aware.
How do current automated tools handle analog design?
How do automated tools handle analog PCB design? Most mainstream EDA tools automate routing mechanics and rule enforcement, but analog correctness still depends on manual placement strategy, return-path control, and parasitic-aware decisions.
Mainstream PCB suites are excellent at accelerating parts of the job: constraint entry, interactive routing, DRC, length tuning for certain nets, and templated reuse. For analog work, they also support the practical building blocks designers rely on: polygon pours, stitching vias, keepouts, net classes, differential pair constraints (useful in mixed-signal), and “rooms” or placement regions.
Where they struggle is the step that absorbs the most expert time: producing a layout that balances competing analog concerns, like high-impedance node shielding, quiet ground strategy, sensitive net routing, power integrity, and separation from aggressors. In other words, the CAD tool can help you execute a plan, but it rarely creates the plan.
Constraint-driven design is a partial solution. You can encode clearance, width, impedance, and sometimes topology-like intent. You can also create templates or reuse blocks for repeating analog channels. That helps teams standardize good patterns, but it still assumes you have an experienced designer setting up the constraints and validating the outcome.
Academic automation often targets a different problem entirely. Tools like ALIGN and other research frameworks focus on analog IC layout, not board layout. They tackle transistor placement, device matching, and process design rules in GDSII. That research is valuable, but it does not solve the day-to-day reality of board-level analog: connectors, stack-ups, plane splits, switching regulators, EMI, and manufacturing-driven constraints.
So if you’re evaluating “best automated tools for analog PCB design,” it helps to bucket options into three groups:
- Mainstream EDA automation (good for productivity, still manual for analog correctness)
- Template and constraint approaches (good for reuse, limited for new layouts)
- AI-driven PCB automation (promising when it understands physics and integrates with real workflows)
Side-by-side: Where automation helps today, and where it stops
Capability that matters in analog
Mainstream EDA (KiCad, Altium, Cadence, Siemens)
Academic analog automation (IC-focused)
Quilter (physics-driven PCB automation)
Fast routing and DRC compliance
Strong
Not the goal
Strong, with physics review
Constraint-driven widths, clearances, classes
Strong
Not the goal
Strong, plus constraint interpretation
Analog-aware placement strategy
Mostly manual
Sometimes, but IC context
Automated candidate generation with physics checks
Return path control, loop area minimization
Mostly manual
Not board-focused
Explicitly evaluated during candidate review
Guard rings PCB, shielding, keepouts
Manual setup
Rare
Automated handling when constrained and appropriate
Mixed-signal separation (quiet vs noisy domains)
Manual planning
Not board-focused
Assisted floorplanning and constraint-driven separation
Manufacturable handoff to existing CAD
Yes
Often no
Yes, returns native-format projects
Practical adoption in real PCB teams
High
Low
High, designed for production workflows
Pull quote: “Analog layout is not just routing. It’s controlled physics, repeated hundreds of times across a board.”
Here's why academic AI tools aren't enough for real-world PCB projects
Academic tools are often impressive, but they usually solve a different layer of the stack. Many are built around transistor-level circuits, netlist-to-layout synthesis, and IC design rules. That means they prioritize matching devices, common-centroid placement, symmetry, and parasitic-aware extraction inside a chip layout environment.
PCB designers face a different reality:
- Board-level parasitics include planes, connectors, vias, and long interconnects.
- Manufacturing constraints vary by fab, stack-up, copper weight, and assembly limitations.
- Noise coupling is dominated by return path geometry, plane integrity, and proximity to switching nodes.
- The workflow has to integrate with Altium, Cadence, Siemens, or KiCad projects, not produce a standalone artifact that can’t be verified or released.
Another practical limitation is feature completeness. Board teams need analog-specific patterns like guard rings, shielding copper, via fences, keepouts, and thoughtful partitioning between high-current switching regions and quiet analog measurement nodes. They also need the mundane but critical details: connector placement, mechanical constraints, heatsinks, mounting holes, and test points. A research tool that cannot reliably express and satisfy those constraints is difficult to deploy in a production schedule.
Finally, even when an academic approach produces a plausible result, it typically lacks the “transparent design review” step that engineers require. Real teams need to know why a layout is considered acceptable, which constraints are satisfied, and where risk remains. Without that clarity, the tool becomes a black box that slows adoption.
The takeaway is not “research is useless.” It’s that analog PCB automation requires a PCB-native approach with manufacturing, constraints, and verification built in.
What sets Quilter apart for analog PCB automation?
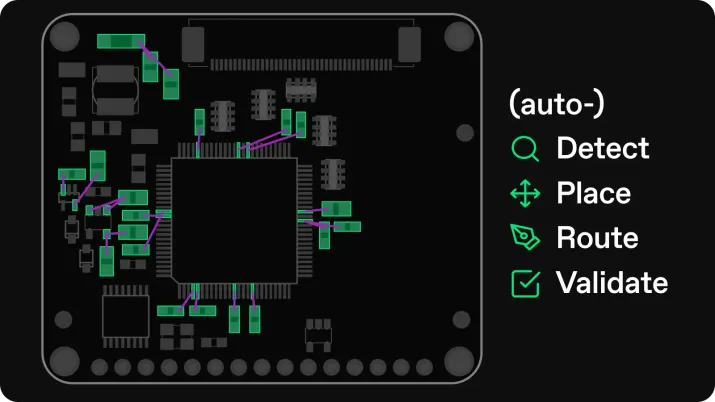
What sets Quilter apart for analog PCB automation? Quilter uses physics-driven AI to generate and validate complete PCB layout candidates against real electrical constraints, not just connectivity and geometry.
Quilter is built around a simple premise: analog automation only works if the layout process is physics-aware. Instead of treating routing like a geometry puzzle, Quilter treats layout as an engineering optimization problem with measurable electrical outcomes.
That shows up in three practical ways:
1) Physics-driven decisions during layout, not after the fact
Traditional flows often look like: place, route, run DRC, then discover late that noise, coupling, or stability is off. Quilter flips the sequence by continuously evaluating candidate layouts against the constraints that matter for real behavior. This is especially relevant to analog signal integrity, where “passes DRC” is not the same as “meets noise floor.”
2) Analog-specific intent becomes first-class input
Analog designers think in intent: keep this node short and shielded, keep return paths tight, isolate this region, control coupling, protect high impedance nets, minimize loop area, and avoid ground loops. Quilter’s workflow is designed to ingest constraints and floorplanning guidance so those intent-driven requirements shape the candidate layouts from the start.
3) It integrates with the tools teams already use
Adoption lives or dies on handoff. Quilter is designed to work with existing EDA workflows. You upload your native project, define the outline and pre-placement, set constraints, review candidates, and export back to your CAD environment for final polish, DRC, fab outputs, and release.
Callout box: Automatic Guard Ring Placement
Guard rings are a classic analog technique for protecting high impedance nodes and reducing leakage and coupling. Quilter can incorporate guard ring PCB strategies as part of constraint-aware layout generation, so shielding intent is applied consistently across candidates.
Callout box: Physics Validation of High-Frequency Nets
Even “analog” boards often contain fast edges: ADC interfaces, clocks, or switch nodes. Quilter evaluates high-frequency routing decisions and flags risk areas during candidate review so you can iterate before release.
How does Quilter deliver better results for analog and mixed-signal boards?
If your current flow is “one layout, one designer, one long cycle,” Quilter changes the economics. The biggest advantage is not that it routes faster in a vacuum. It’s that it makes iteration abundant. For analog and mixed-signal teams, abundance is the difference between guessing and knowing.
A practical, anonymized workflow example
Consider a mixed-signal sensor interface board:
- 4-layer board, tight mechanical outline
- Precision analog front end (instrumentation amplifier, anti-alias filter)
- 24-bit ADC with a clock and digital interface
- Switching regulator plus LDO cleanup rails
- Multiple connectors and test points
- Key constraints: low noise floor, stable gain, clean reference routing, minimized coupling from the regulator switch node
Manual baseline:
A senior designer spends time on floorplanning, placement, and cautious routing. After initial DRC, the team runs bench tests and finds unexpected ripple coupling into the measurement path. They revise the placement, improve return paths, add shielding copper and via stitching, and re-route sensitive nets. The first pass can take 2-4 weeks, and a second pass can take another 1-2 weeks, especially if the schedule is crowded.
With Quilter:
- Upload the existing CAD project and define board outline and pre-placed connectors.
- Provide constraints for sensitive nets, keepouts, and power regions.
- Generate multiple complete layout candidates in parallel.
- Use the transparent design review to select candidates that best satisfy analog constraints and minimize coupling risk.
- Export back to your CAD tool for final review, annotations, and release artifacts.
Outcome:
Instead of producing one “best guess” layout, the team reviews multiple physics-evaluated candidates in hours. The team can pick a layout that best separates the regulator region, shortens critical loops, and protects high impedance nodes. Even if a final polish cycle is needed in CAD, the high-risk structural decisions are already explored and validated early.
Pull quote: “The win is not one perfect autoroute. The win is exploring real options before you commit the board.”
Why this matters specifically for analog teams
- Fewer late surprises: Physics-aware review surfaces risk earlier.
- More design cycles: You can test more floorplans and stack-ups without paying weeks per attempt.
- Cleaner handoff: You still finalize in your native CAD tool, but you start from a layout that has already been evaluated against the constraints that matter.
If you’re an engineering manager, this translates to schedule reliability. If you’re the designer, it translates to less time spent on repetitive routing and more time spent on decisions that actually affect performance.
What should you look for in a next-generation analog PCB automation tool?
When evaluating automated analog PCB design solutions, it’s easy to get distracted by surface features. The real differentiators are the ones that reduce analog risk while increasing iteration speed.
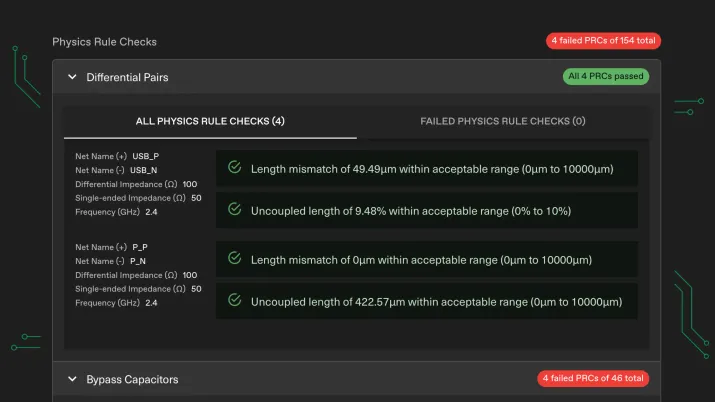
1) Physics-aware validation, not just geometric DRC
A next-generation tool should answer: does this layout behave the way the circuit expects? That includes return path quality, coupling risk, loop areas, and high-frequency behavior. DRC is necessary, but it is not sufficient for analog signal integrity.
2) Analog-specific constraint handling
Look for support for what analog designers actually do:
- guard rings PCB and shielding intent
- keepouts around high impedance nodes
- controlled return paths and loop minimization
- domain separation for noisy switching regions
- impedance and topology constraints where needed
3) Transparent review and debuggability
If the tool produces a candidate, you need to know what it satisfied, what it traded off, and where risk remains. This is especially important for regulated industries and mission-critical hardware where “trust me” is not a verification strategy.
4) Seamless integration with existing EDA
Adoption depends on not breaking the release pipeline. The tool should import native CAD data, respect board outlines and pre-placement, and export back into the same environment your team uses for signoff.
5) Iteration at the system level
Analog issues often show up only when the whole system is considered: power topology, digital aggressors, connectors, and mechanical constraints. The right automation solution should help you iterate on the full board, not just optimize a tiny sub-block.
Quick decision guide: “Best automated tools for analog PCB design” by need
If your main need is…
Best-fit approach
Why
Lower cost, basic automation, lots of manual analog expertise
Mainstream EDA + templates
You get solid productivity, but analog correctness still relies on expert designers
Standardizing repeated analog channels
Constraint-driven reuse blocks
Great for known-good patterns, limited for new board-level tradeoffs
Faster analog iteration with physics-driven confidence
Quilter
Generates multiple candidates and evaluates them with physics-aware review while preserving CAD handoff
Ready to see how physics-driven AI transforms your analog PCB process?
Analog automation is finally becoming practical because physics-driven PCB layout closes the gap between “connected” and “correct.” Quilter brings that into a workflow real teams can adopt: upload native CAD files, define constraints, generate multiple candidates, review with transparency, and export back to your tool for final release.
If you’re exploring AI PCB automation for analog or mixed-signal designs, start here:
Want a concrete evaluation? The fastest way is to run one of your analog designs through a candidate-generation and review cycle, then compare how much iteration you can achieve in a single day versus a traditional week.